

Oh, the art of a fantastic #nailfie can be a challenge but with the right equipment and a little know how we are confident you can take your nail photos to a 10!
Lighting
First, you want to ensure that you are starting with good lighting. This is the key to getting better nail photos. Whether you are using natural light or photography lighting or both, this is the first step to creating beautiful art with your nail designs. When you use your flash or lighting that is warmer (below 5000K) the photo may appear to be discoloured, skin tone may be off, and the colours won't pop. We suggest using photography lighting, such as a ring light, or continuous lighting that have daylight LED bulbs (5000K or higher).

Photo: So Nailicious
Composition & Posing
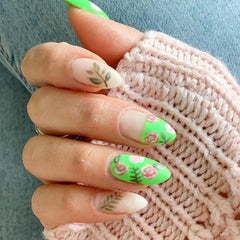
How you set up your shots will also determine the quality of your photo. Consider the poses that you are using, as well as the composition of the image. Here are some tips for nail posing that will help you get better nail photos:
- Try to always have the nails slightly bent; this helps to avoid showing off any wrinkles or fine lines in the hands.
- Try holding an object to add contrast or change up the pose.
- Always hover your hands above a surface to avoid the sausage look.
- Use your polish or product bottles as additional props in your image.
- Get close-ups to get the more delicate details.
- Remember the pose should always appear soft and the hand unstrained.
- Try to avoid side profile shots of your nails. Sometimes the wrong angle can make your nail shaping look off.
- Lastly, move your lighting as needed when changing poses.

Don't Miss The Finer Details
Be sure to take a look at your whole image to ensure that everything is just perfect. Nothing can ruin a good photo like untouched or dry cuticles. Be sure to take extra care to prep your nails and cuticles prior to starting but also ensure that they are perfect come picture time.
Along with this, don't over oil your nails! Too much oil and it can take away from the sheen of the beautiful top coat that you applied. If there is way too much cuticle oil applied the skin on the fingers has a shine, and it looks unnatural. We like to suggest going a step further after cuticle oil is used to moisturize the hand so that everything is well hydrated for the nail photo.
Photo Editing
Always edit your photos; this is a must! The key here is to make your beautiful work pop out of the picture, without any filters. One of our favourite phone editing apps is SnapSeed; it has everything you need from adjusting contrast, brightness, highlights, shadows and much much, more.
The key when editing is to bring out any shadows and ensure that the photo is well lit. Additional cropping may be needed to set up the image and take out an unnecessary negative space.

Photo: Sunny Storm Marketing
Your photos may not go straight to a 10, but remember that with a little trial and error, and you will get there. Don't be afraid to try new things or try taking photos in different lighting.